

WORDS & PICTURES: Carlee Colonneso
2020 was an interesting year, needless to say, but my family still has plenty of enthusiasm for the upcoming holidays, even with all the ups and downs.
Embracing the traditions this year has been vital towards maintaining our kids’ well-being, plus my husband and I have been open to trying new ideas to help limit activities outside of the home.
Speaking of traditions, whether baking cookies, wrapping gifts, or decorating together, it is the special moments like these that bring us all closer and truly get us into the holiday spirit.
The kiddos and I are also making handmade decorations and gifts. Not only is this a great way to start off the season, but it gives them another activity to keep them entertained as well as utilizes both creativity and hand-eye coordination.
One of those art projects that we look forward to creating together is ornaments. Not only can we place them on our tree, but we can also use them to add a little something extra special to family member’s gifts.
Just like always, I am all about utilizing what I already have, so I looked for items that could be upcycled or used differently. Thinking of the shape of a reindeer and a shiny red nose, I decided to put together a paper plate ornament craft.
Is your family interested in making their own fun Reindeer Paper Plate Craft Ornament? Check the “How To” below.
What You Will Need: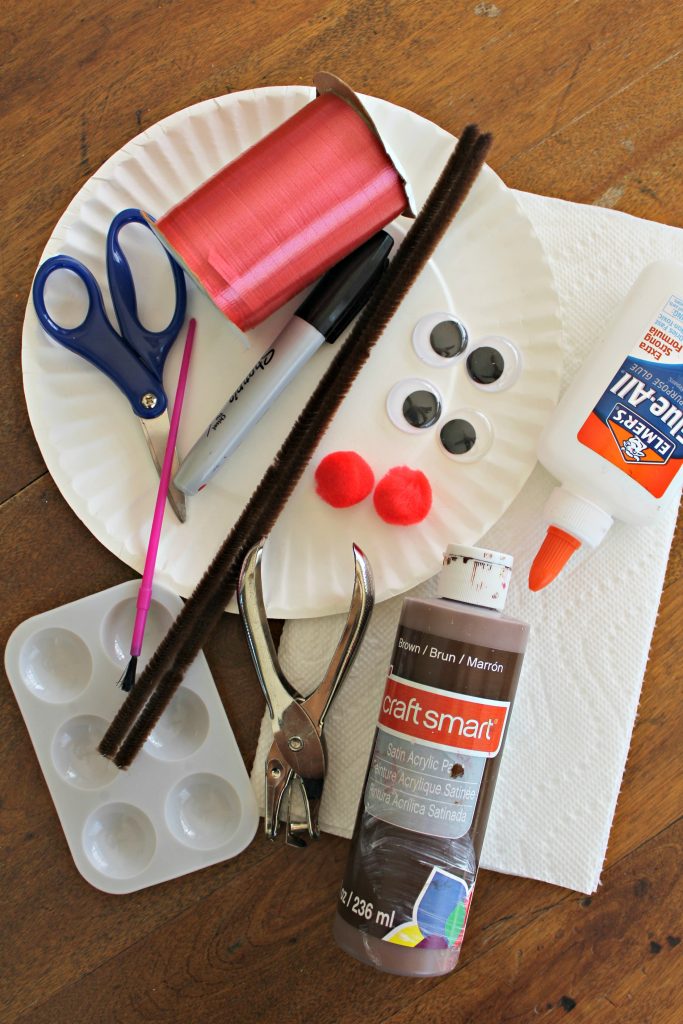

- White Uncoated Paper Plate
- Brown Acrylic Paint or a Brown Crayon
- Brown Fuzzy Sticks AKA Pipe Cleaners
- Red Pom Poms
- Large Googly Eyes
- Glue
- Paint Brush
- Hole Punch
- Safety Scissors
- Ribbon
- Black Marker
Tip: You can locate most of these items at a local craft store.
Directions:
To get started with the ornament, first cut the paper plate in half.
Next, take the two halves and fold them into a cone shape and glue the folded pieces together to hold the form.
Tip: Place paper towels or old newspaper down to protect your surfaces and have children wear an apron or oversized t-shirt to protect clothing.
Then begin painting the cone shape. Once the paint dries on both sides, place a hole at the top center with the hole punch. Next, cut out a piece of ribbon long enough to be tied at the top for hanging the ornament on a tree or gift.
Next up, glue the googly eyes and add one of the red pom poms for the reindeer’s nose. If you want to make a female reindeer, add lashes with the black marker.
To finish the activity, bend a brown fuzzy stick to look like antlers and add glue along the center. Insert the glued part of the antlers into the top of the reindeer face and push down to attach.
Once the Reindeer Paper Plate Craft Ornament is dry, it can be hung on a gift, a tree, or even a wreath. As you can see, the decorations are adorable and are simple to put together.
I hope your family enjoys making this craft as much as we did, and you have a wonderful holiday season!


